Kingston datatraveler g3 8gb firmware. Recovering SD cards and USB flash drives in Windows
The era of CDs and DVDs is almost completely over. Today, flash drives are used everywhere as universal storage media. USB drives are small in size, have a sufficient amount of built-in memory and allow you to add or delete any files without any harm to existing ones.
Everything seems to be fine, but flash drives have one significant drawback - if used incorrectly, they often fail... The most typical failure is the computer identifying the drive as an unknown device or a disk with zero memory capacity:
If you were careless to unplug your USB drive from its slot without first using the safe removal function, it is quite possible that it will become a victim of a short circuit and become unreadable. Is it possible to restore a flash drive after such an incident, read on...
Types of flash drive failures
So, if you are reading this article, then most likely you already have a “dead” flash drive. Before you try to revive it, you need to find out what kind of trouble happened and how your USB drive reacts when connected to a PC. In other words, let's see how bad it is :)
The flash drive can react in two ways: either the indicator diode on it will light up or not. If the diode does not light, then a physical breakdown can be diagnosed. In this case, you can try to repair the drive only if you have a soldering iron and know how to work with it (the last section of the article is about this).
A much more optimistic forecast can be given if the indicator lights up and does not go out. This means that our problem is software and can be fixed using special software. In this case, one of two scenarios awaits us: the flash drive may be detected as an unformatted disk with a capacity of 0 bytes, or it may not be detected at all.
If the computer sees an empty drive, then everything can be solved by correct formatting. However, most often the problem is that due to a sudden power surge, the firmware of the flash drive is damaged and we will have to look for it on the Internet.
To summarize the algorithm for diagnosing a breakdown, I suggest you act according to the scheme below:

Formatting treatment
The easiest damage that can happen to your flash drive is a file system failure. Failure can be of two types: with a violation of the cluster layout and without. In the latter case, you can even do without formatting and save all the data on a flash drive!
You can diagnose a failure without violations if the flash drive is detected by the computer, but does not open. The computer simply freezes when trying to display its contents, so we don’t try to open anything. We look at what letter the removable media is identified under, launch the Command Prompt (Start - Run - cmd) and enter the command "CHKDSK G (or other letter): /f":

The /f key will automatically try to correct file system errors that led to the unreadability of your flash drive and, if the command completes successfully, you will receive a fully functional drive with all the data that was on it before the error appeared!
Unfortunately, it’s not often that you get off so easy... Much more often you have to deal with flash drives, whose size is determined by the computer as 0 bytes. In this case, formatting can help. And not with standard tools, but with special utilities. One of the most universal in this regard is HP USB Disk Storage FormatTool (you can download it in the archive using the link at the end of the article):

This utility allows you to correctly format any media in FAT32 and NTFS systems. To do this, just select the desired device from the drop-down list and click the “Start” button. By default, the quick format option is activated, but this mode may not work with a damaged flash drive. If unsuccessful, you must uncheck the corresponding box before starting the procedure again.
In particularly advanced cases, when even HP USB Disk Storage FormatTool gives an error, but the flash drive is still recognized as removable media, so-called low-level formatting can help. It erases all memory sectors byte-by-byte and fills them with zeros, making it impossible to attempt to recover data in the future.
If saving a flash drive is more important to you than saving the data that was on it, then the HDD Low Level Format Tool utility (available in the archive for the article) can help you format it in the above-mentioned way:

When you start the program, a window will appear asking us in what mode we want to use the HDD Low Level Format Tool. Naturally, we need a free one, so we click the “Continue for free” button or simply close the window. A main window will appear with a list of disks. Select the one you want, click “Continue”, confirm your consent and wait for the process to complete.
Low-level formatting itself takes quite slowly, so be prepared in advance for the fact that it can take about an hour (depending on the capacity of the flash drive and its read/write speed). Moreover, in free mode, formatting speed is limited to 50 megabytes per second (approximately 180 gigabytes per hour).
Determining the controller type
If formatting does not produce results or the flash drive is initially detected by the computer as an unknown USB device, then the problem is most likely due to damaged firmware. Finding firmware for popular media models on the Internet is not that difficult, but you need to know exactly what to look for. And to do this, first of all you need to determine the type of flash drive controller.
This can be done in two ways: using special programs or using PID and VID identifiers. It is preferable, of course, to use programs with good databases, since controllers from completely different companies may have the same identifiers and you will have to search for a long time for a suitable utility for flashing the firmware...
The best in terms of determining the type of controller are the Chinese programs ChipGenius and ChipEasy, and from the Russians, perhaps, Flash Drive Information Extractor (everything is in the archive). You can use any of them, however, the disadvantage of the Russian language is the lack of links to download utilities for firmware (highlighted in pink in the screenshot):

All of them provide quite a lot of different information, however, we are mainly interested in two parameters: device identifiers (highlighted in yellow in the screenshot) and, directly, the controller model (highlighted in green). Knowing this data, we can find a firmware program on the Internet.
By the way, Chinese programs already give us links to such programs, but it’s not always possible to download them, even if you use Google’s page translator, so the search will be discussed separately below. It’s a pity, of course, that our developers couldn’t integrate the search for a link to the firmware into their program, but oh well :)
In the meantime, it’s worth mentioning that you can find out the identifiers (but not data about the controller!) of a flash drive without special utilities. To do this, you need to go to Device Manager (context menu of the “My Computer” icon - “Properties” - “Device Manager”), select our drive from the list, call up its properties and in the “Details” tab select the “Hardware ID” property:
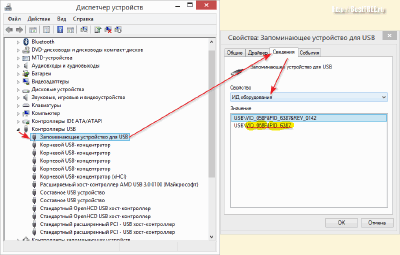
We have at our disposal an unnamed flash drive (alas, it’s working :)) and we found out its identifiers, as well as the type of controller and its model. Now it's time for the most difficult procedure - searching for a program for firmware.
Flash drive firmware
Firmware or firmware (abbreviated F/W) is a microprogram that controls the operation of the flash drive controller. If it fails, the drive, while remaining physically functional, stops responding to standard computer requests, which is why you can neither read nor write information from it.
Fortunately, the firmware for most controllers is freely available on the Internet. Therefore, the main problem is only finding them. You can search directly in search engines using queries such as: "Alcor (chip manufacturer) AU6982 (chip model) VID: 058F PID: 6387 firmware", and on specialized sites.
One of the best Russian-language resources for searching and downloading firmware for any flash drive is FlashBoot.ru:

On the search page we need to enter the PID and VID identifiers, and then click the "Search" button. We will receive a whole list of flash drives that have the same ID as ours. The task now comes down to finding a device with the same controller model as ours.
If you find a flash drive in the table that resembles yours in all respects, click on its name and see detailed information about it:

Here we are primarily interested in the UTILS line, which contains the name of the utility needed to flash our flash drive. We copy this name and search for it on the Internet. You can do it differently. You can search on the same site. To do this, go to the "Files" section in the top menu. True, the names of the programs from the list and those on the site differ, so the search will not always be successful.
In any case, we found out that our flash drive is based on an Alcor chip and its model is AU6982. This is already enough for a successful search, which leads us to the need to download the AlcorMP utility one of the versions available on the website:

We unpack the downloaded archive into a folder, check whether the program version matches the version that we identified by identifiers and run the executable file. If the firmware version is suitable, then we will see data about our flash drive in one of the cells of the working window. All you have to do is press the "Auto" or "Setup" button (if you know how to configure parameters) and wait for the firmware to finish.
If the working window is empty, which often happens, then we were unlucky the first time :) You need to try downloading other versions of programs suitable for the same chips as your flash drive. In short, this is where the lottery begins and sometimes you can try up to a dozen different utilities until you find the only one that will correctly identify your drive.
After flashing the firmware, safely unplug the flash drive and reinsert it. If everything worked out, then it should be detected by the computer without any problems. If not, try other flashing programs until you succeed.
Treatment for physical injuries
The most severe case of a flash drive failure is when it does not show any signs of life when connected to a PC: the indicator does not blink, messages about unknown equipment do not appear, and there are no unidentified devices in the Device Manager. In this case, real physical damage can be stated.
However, unless the flash drive has been dropped from a great height, exposed to high temperatures, or dropped into water, you have a small chance of saving it (and sometimes even the data on it!). Most likely the problem is that due to a short circuit on the flash drive board, something has become unsoldered. Often the legs through which food flows are unsoldered.
In any case, we will have to open the flash drive case to try to restore it. To do this, unfortunately, you may need to unscrew it if it does not disassemble. Inside we will see something like this board:

The main “problem” areas are the legs of the USB plug and the power stabilizer, which over time tend to become unsoldered or burn out due to short circuits. If you know how to work with a soldering iron, first try soldering the outer terminals of the plug, which are responsible for power and grounding. This should restore normal power to the flash drive.
If, after manipulating the soldering of the outer legs, the flash drive starts blinking when connected to a PC, but is not detected, perhaps the problem is in the unsoldered legs, receiving and transmitting data. Solder them too and check again. If the connection is not accompanied by a blinking indicator, then most likely you need to solder or replace the power stabilizer.
conclusions
Alas, sometimes it happens that even after all attempts at resuscitation, the flash drive shows no signs of life. In this case, you should admit that you did everything you could and, with a clear conscience, throw the media in the trash.
Although, if the flash drive is very dear to you, you can take it to a good service center. There they can remove the memory chip and transfer it to a new board. True, the cost of such an operation is comparable to the cost of a new device, and sometimes even exceeds it! Therefore, it is advisable to do this only if there is some important information on the flash drive.
However, most often the matter does not reach the service center. Most flash drives can be restored at home. Our article and archive of programs will help you with this, which you can download from the link below. I wish you success!
P.S. Permission is granted to freely copy and quote this article, provided that an open active link to the source is indicated and the authorship of Ruslan Tertyshny is preserved.
The SmartBuy flash drive is a common removable storage device that many modern users use with great pleasure. The manufacturer has been successfully producing high-quality optical media for many years. Combined with an acceptable price, attention to such a product increases several times.
Restoring the functionality of a SmartBuy flash drive is within the capabilities of a PC user.
In addition to an acceptable cost, such flash drives are accompanied by excellent quality, although this does not at all guarantee that during the operation of the media it is impossible for unforeseen situations to arise. SmartBuy flash drives can also fail, but you shouldn’t immediately say goodbye to them, sending them off to a “well-deserved rest.”
You can try to do some manipulations to restore the functionality of the removable drive. In most cases, users manage to restore “life” to the drive, so it will be able to serve for several more years and technically justify its repeated “resurrection.”
If your digital drive has stopped showing “signs of life,” it means that circumstances have occurred that impede its normal functioning. Sometimes you yourself can act as the culprit of such troubles. This happens when you completely ignore the rules for removing removable media. Also, such software failures can occur when a flash drive is actively used, subjecting it to constant writing, reading and rewriting.
A flash drive may stop working if an unexpected guest in the form of a virus gets onto it and makes adjustments to its settings. Even a simple drop of a flash drive can cause its premature failure, since in this case mechanical damage to the removable drive is quite often observed. It is especially difficult to accept when the MicroSD SmartBuy, on which numerous unique photographs are stored, stops functioning.

However, you should not hang your nose; you can use existing utilities that allow you to restore the SmartBuy flash drive, as well as successfully restore all the content that was previously stored on the drive.
Let's compile all of the above. Problems with the storage device in question may arise due to the following reasons:
- a large number of rewrite cycles;
- incorrect extraction;
- infection by virus software;
- overheat;
- software errors;
- static voltage;
- controller malfunction;
- mechanical damage.
Based on current practice, most problems are characterized by a failure of the controller, which communicates between the flash drive itself and the computer interfaces.
It should be noted right away that, unfortunately, you can only hope to successfully restore the functionality of this media if its inoperability is caused by software problems and not mechanical damage. Yes, of course, someone will say that even “mechanics” can be cured, but for this you need to have sufficient skills and specialized devices, which not everyone has.
In addition, solving software errors also requires certain knowledge, skills in searching for information and working with specialized software.
The essence of restoring functionality is to reflash the controller chip. The difficulty is that each type of controller requires a specific utility, errors in the selection of which can completely neutralize all attempts to return the flash drive to functionality and, more importantly, to obtain the information stored on it.
Therefore, the first thing you should do is try to save all possible files, and only then resort to radical measures.
Let’s focus on file recovery for now and then return to “revitalizing” the flash drive.
File recovery programs
If your flash drive shows no signs of life, use any SmartBuy MicroSD flash drive recovery program. There are several such programs, so you can choose the option that is most accessible to understanding.
You can try using the CardRecovery utility. It works great with SmartBuy removable media, and it can also restore mobile phone memory cards very well.
So, find the CardRecovery utility on the Internet, download it and install it. After that, run the program, in the “Drive letter” section, select the flash drive that you are going to restore, as well as restore the content that was recorded on it.
Be sure to indicate what file format you would like to restore. The program will ask you to specify the folder in which the recovered files will be saved. You can create such a folder in advance, and then specify the path to it in the program.
After this preliminary work, you can start clicking on the “Next” button. All you have to do is wait until the program finishes, and then look at the list of all recovered files.

You can use some other similar program. For example, the modern and multifunctional utility PC Inspector Smart Recovery has proven itself well. It will ask the user to indicate the drive where the files that are now important to recover were stored. You can also use programs such as R-Studio, Easy Recovery and Flash Memory Toolkit.
Restoring the flash drive
If you are faced with a slightly different task than simply recovering lost files, then resuscitation actions may be different. In particular, if you have a non-working SmartBuy flash drive, the DiskInternals Uneraser recovery program will help you successfully solve this problem.
ADVICE. By the way, some experienced users claim that SmartBuy flash drives have one unique characteristic. You can simply put a “dead” flash drive in a safe place and “forget” about it for several years.
After this decent period of time, the removable drive can itself begin to function again, as if there was no system failure. Of course, this option is unlikely to suit anyone. Nobody wants to wait several years, especially since there is no 100% information on when the period of such “waiting” will definitely end. It is for this reason that it is easier to use utilities that immediately help restore the functionality of removable media.
Working with DiskInternals Uneraser is very simple. After launching it, a dialog box opens in which you should find the “Recover” option located in the top row of the menu. Next, the program will independently take care of performing all the necessary actions. You just have to sit and wait quietly. The program will not only return the flash drive to functionality, but will also offer to return important files that were deleted during recovery, since the process involves formatting.

Reflashing the controller
Have you recovered your files? Okay, we can start working with the controller.
Important point! The target/repaired flash drive must be at least somehow determined by the system. If you insert the media, and there is silence in response (the indicator does not light up, the system does not make a characteristic connection sound, Disk Management and file managers do not see the device, the BIOS ignores the connection), then you will not be able to use this method. And such an outcome of events is extremely deplorable, since it will require physical intervention, with an appeal to the appropriate specialist.
Otherwise, if the flash drive is recognized by the system, but simply refuses to work, do the following:

IMPORTANT. Pay special attention to the correspondence of the values, since an incorrectly selected one can lead to complete inoperability of the device.
If in doubt, try additionally using the “Flash Drive Information Extractor” program, which will provide the most complete information about the selected device.
Once compliance has been confirmed, download the proposed software and follow the recommendations of the utility. In most cases, you only need to click on the “Restore” button.
Conclusion
Experienced users recommend not to wait for the flash drive to present such an unpleasant surprise, but to carry out preventive measures in a timely manner. In particular, when actively using removable media, it is recommended to perform defragmentation and periodically make backups.
It is also important to remember that you cannot load removable media completely; you need to always have free space on it. Of course, it is very important to remove the media from the computer correctly, not to drop it, or to avoid other mechanical damage.
So, if you carry out such simple preventive measures, removable media can last quite a long time. If trouble happens and the flash drive stops working, you can use utilities and professionally “breathe” new “vitality” into it.
Restoring a Kingston Datatraveler flash drive may be necessary if it fails, but some valuable information remains on it. Kingston is one of the leading manufacturers and suppliers of removable storage devices. This company produces high quality memory cards, including SD drives and compact flash drives, which users use to back up and store files from digital cameras, mobile phones, etc. Their volume can be 2 GB or more. But for a variety of reasons, any data storage device can fail, no matter how reliable it is. This ultimately leads to problems with files saved on the flash drive. They may be damaged or disappear without a trace.
Usually, after losing important data, the user experiences a lot of stress, but in fact, this is not yet a reason to despair. Your information is not completely erased from the memory card and there is a chance that it can be returned. In this case, you will need a memory card recovery program that will help you recover data on your Kingston device.
Recovering files using a Mac computer
It is important to regularly back up your important data to ensure that you do not lose it if your external storage device fails. But if circumstances are such that you unexpectedly lost some important files that do not have backup copies, there is still a chance to recover the data.
If you are interested in how to recover a flash drive, we recommend using the iSkysoft Data Recovery for Mac application, which has an intuitive interface and ease of use. This Kingston flash drive recovery utility will help you get back data such as videos, images, text files and music in just a few clicks. The application supports any removable drives from various manufacturers, including Kingston. The program offers users the features needed to recover damaged or deleted files from microSD, SD, CF, MC, D, etc.
Below are the simple steps to recover your files using a Mac OS X computer and Kingston Flash Drive Recovery Utility. These instructions are also valid for Mac OS 10.12 Sierra. You need to keep in mind that under no circumstances should you save files on a memory card where information has leaked, because new data may take up disk space, resulting in overwriting.
To recover data using a Mac, you need to follow these steps:
- Download the iSkysoft Data Recovery application and install it on your computer. Connect your digital camera, mobile phone or dedicated memory card reader to your PC using a USB cable. Launch the program through the Applications folder. When the main interface of the application appears, select the file types you want to recover. Click "Next".
- In the next window you will be able to see your Kingston memory card. You need to select it and click the Start button in the lower right corner of the window to start scanning lost files on a Kingston 2GB flash drive or any other model. You can enable the Deep Scan option if you are unable to find the data you need on the first try. A deep scan will take much longer, but in this case the user will have a better chance of getting the deleted information back.
- After scanning, you will be able to see several folders on the left side of the interface. Select the directory you want to restore and view the details. After checking the contents, click the Recover button at the top of the window and select a new folder to store the extracted files. After this, all you have to do is press the OK button to get back the deleted information from the Kingston memory card.
Recovering files using a Windows computer
iSkysoft also offers a solution for recovering a USB flash drive through the use of the Data Recovery application on the Windows platform. This tool can help you retrieve lost files of almost any type if they were deleted due to user error, malware, improper use of a flash drive, etc.
The iSkysoft Data Recovery application offers several recovery modes, among which every user will find something suitable for themselves. The simple and intuitive interface of the Kingston flash drive recovery program offers a preview of functions, so even inexperienced users can easily understand their purpose. The application allows you to recover exactly the files you need. For this purpose, the ability to preview data has been implemented, allowing you to save your time and disk space. Data Recovery application works perfectly on all computers with Windows operating system.
To recover data using Windows, you need to follow these steps:
- After successful installation of the program, launch it to begin recovery. The application offers 4 different modes that help you recover files quickly and conveniently. If you want to completely recover all data on the memory card, you can simply select Lost File Recovery mode on the main screen. Wizard Mode allows the program to return data by using default settings and minimal user intervention. You will only need to answer 2 questions, after which the program and flash drive will do the rest on their own.
- If Lost File Recovery mode was selected, then on the next screen you will see a list of partitions to scan. You need to select the drive that matches the memory card and click Start to start scanning. At the bottom of the page, you can check the Enable Deep Scan option. This allows you to recover even deleted files if the flash drive has preserved the structure of the folders in which they were contained. In this case, recovery may take more time, but the result should satisfy the user.
- After the scan is completed, you will be able to see all the hidden files that the flash drive contains. On this screen, you should select the data you want to recover and click the Recover button in the lower right corner of the interface.
Who is the Data Recovery app suitable for?
This recovery software works perfectly with any Kingston microSD memory cards of 4GB, 8GB, 16GB, 32GB, etc. It is a very useful tool for anyone who uses external devices from this company to store important files. It can be useful for professional photographers and camera operators who work with a variety of multimedia files every day. Even ordinary users who need to recover important information from a flash drive (documents, family videos and photos) can use this effective tool to recover external drives.
This article is intended to help with software recovery of USB Flash Drives based on the SK6211 microcontroller manufactured by Skymedi. This controller is found in flash drives from various manufacturers, for example: Kingston, Kingmax, A-data, etc. The utility was chosen as an example. It, like many others, is designed to work in the OS environment - MS Win XP. The Kingston DT100/1GB flash drive was chosen as the “test subject”.
The utility kit includes:
1) SK6211_20090828.exe – the actual main module.
2) SK6211_User_Manual.pdf – instructions for the program in English
3) SK6211BA_Skymedi Flash Support List _20090828.xls – “Flashlist” - a list of memory modules that are supported by this version of the utility. (Useful for determining “CodeBankVer” by date)
4) SK6211BA R-W Performance_Capacity List_20090828.xls – Summary table of speed tests of various memory modules in single-channel and dual-channel modes in Win XP sp2 & Win 2k sp4 OS.
5) SK62XX_FAT_20090505.exe & SK62XX_FATool_UserGuideV1.pdf – auxiliary utility for flash testing.
6) ErrorCodes.txt – list of error codes.
7) DrvSwitch.exe – factory driver.
8) Driver_Using_manual.pdf – instructions for using the driver.
1. Preparation
We connect the flash drive and find out the VID/PID, for example using ChipGenius 3.0. The test subject has VID = 0951 PID = 1607.
Run the utility “SK6211_20090828.exe” and select default in “Configuration Selection”.
We see that in the first window (DUT1) the flash drive has been identified (SAMPLE – No Match), but it is not ready for firmware yet! SAMPLE = example, No Mach = No Match. This means that the current settings (default) do not correspond to the internals of the flash drive. The utility has already determined that the flash drive is built on a controller that responds to its requests and has already read information from its firmware.
This information can be viewed by double-clicking on SAMPLE.

Here we see the contents of the firmware:
1) SK6211 controller
2) Memory FID (AD D3 14 A5 34) and its name (HY27UT088G2A)
3) CodeBank version: C080512A_F080516A
4) Firmware version: CodeSwap-0512
5) The rest is not so important (date of manufacture / utility version / configuration name = “engraving on the USB connector” / VID&PID codes, etc.)
6) Channel: Byte Mode (Single channel mode. May be useful in settings!)
Everything is fine here! But what to do when the firmware crashes so that most of this information is missing!?
Controller Version: SK6211BA
Flash Part No.: No matched Flash Part No.
Flash ID 01: 0x89 0x95 0x94 0x1E 0x74
Flash ID 02: 0x00 0x00 0x00 0x00 0x00
Flash ID 03: 0x89 0x95 0x94 0x1E 0x74
Here the utility read the FID from the flash drive, but could not use it to select the memory from its list!
Conclusion: try another utility or check your contacts. Sometimes restoring contacts on the Data Bus between the controller and the memory changes the ID number and the utility, using the correct ID number, finds a match in its Database.
Controller Version: SK6211BA
Flash Part No.: I29F32G08AAMD1_S
Total Flash Size: 8192 MB
4K Page, MLC
Flash ID 01: 0x89 0xD7 0x94 0x3E 0x84
Flash ID 02: 0x89 0xD7 0x94 0x3E 0x84
Flash ID 03: 0x00 0x00 0x00 0x00 0x00
Flash ID 04: 0x00 0x00 0x00 0x00 0x00
Flash ID 05: 0x00 0x00 0x00 0x00 0x00
Flash ID 06: 0x00 0x00 0x00 0x00 0x00
Flash ID 07: 0x00 0x00 0x00 0x00 0x00
Flash ID 08: 0x00 0x00 0x00 0x00 0x00
Here the utility found memory in its database. But the Code Bank version is unknown! We find it by searching for the date by the name of the flash chip in the file SK6211BA_Skymedi Flash Support List _20090828.xls

Now we are looking for suitable Code banks.
Open the file:
…\SK6211_PDT_20090828\CodeBank\2806\CBVer-1.2.2.44.ini

We find version 09.03.09 by date: C090309A_F090309A
2. Settings
Let's return to the experimental subject. Click the “Advaced” button to access advanced settings. Password – 123456.
1) register VID & PID: 0951 & 1607
2) Vendor Name: Kingston
3) Product Name: DataTraveler 2.0
4) Revision: 8.2 (leave unchanged)
5) Disk Type: Removable (leave it unchanged)
6) S/N: 001478544881SK8703120829 (this is the test subject’s own serial number)
7) S/N Gen: (3) Don't Change SN
Below you can skip to
8) Fixed Flash Size = 1024 (set the original size of the flash drive)
9) When you set the checkbox to Erase All, the message appears: Warning Message: System information will be eliminated after erase all!!!
(Warning: system information will be destroyed after setting the “delete everything” mode!!!)
Go to the right window Flash Options
10) Select a controller: SK6211BA
11) Select Code Bank Ver: C080512A_F080516A (the one that the utility gave by double clicking on SAMPLE) Now I expect that in the Flash Selection section it should be possible to select the desired memory - HY27UT088G2A, but this does not happen. What is the reason? Perhaps in the utility version! After all, the firmware version indicates: PDT Version: SK6211_PDT_20080616_BA, and I use SK6211_20090828! We follow the path of choosing a flashlist. We find the date - 04/02/2008, but I don’t find names with such a date in the list and Code Bank versions with the closest date are not suitable either! The assumption of matching the date from the flashlist is not suitable for this flash drive. Only a complete search helped! When selecting C090828A_F090828A, the utility gave the opportunity to select the desired memory!
12) Next select Channel Mode: Single
We don't change anything else.

We receive the READY status

Now the utility is “ready” to flash the flash drive.
Click Auto-LLF
3. Work on mistakes
44 -
2 -
when changing read/write test error 37 -
The jackdaw on ERASE ALL helped
45 -
(Status READY, error in LLF process)
It helped: switching to test mode by shorting 31-32 legs to the memory m/s
and re-flashing
_______________________________
101 -
We need a more recent version of the utility that supports new memory.
ps: in the previous version 20090709_BA (34 - )
_______________________________
94 -
1 -
When trying to flash - (Access error)
We removed the USB extension cable that was causing the losses.
_______________________________
When working on bugs, we used the experience of forum users: Vitorrio, SeeJay, E1haZ and others.
Discussion of the article and problems with recovery are discussed in this forum thread.
Various problems with USB drives or flash drives are something that probably every owner faces. The computer does not see the flash drive, files are not deleted or written, Windows writes that the disk is write-protected, the amount of memory is displayed incorrectly - this is not a complete list of such problems. Perhaps, if the computer simply does not detect the drive, this guide will also help you: (3 ways to solve the problem). If the flash drive is detected and works, but you need to restore files from it, first I recommend that you familiarize yourself with the material.
If various ways to fix USB drive errors by manipulating drivers, actions in Windows Disk Management or using the command line (diskpart, format, etc.) did not lead to a positive result, you can try utilities and programs for repairing flash drives provided by both manufacturers , for example, Kingston, Silicon Power and Transcend, and third-party developers.
On the official website of Silicon Power, in the “Support” section, a program for repairing flash drives from this manufacturer is presented - USB Flash Drive Recovery. To download, you will need to enter your email address (not verified), then the UFD_Recover_Tool ZIP archive is downloaded, which contains the SP Recovery Utility (requires .NET Framework 3.5 components for operation, will download automatically if necessary).

Similar to the previous program, SP Flash Drive Recovery requires an Internet connection to work and restoration of work occurs in several stages - determining the parameters of the USB drive, downloading and unpacking a suitable utility for it, then automatically performing the necessary actions.
You can download the program for repairing flash drives Silicon Power SP Flash Drive Recovery Software for free from the official website http://www.silicon-power.com/web/download-USBrecovery
If you are the owner of a Kingston DataTraveler HyperX 3.0 drive, then on the official Kingston website you can find a utility for repairing this line of flash drives, which will help format the drive and bring it to the condition it had when purchased.

You can download Kingston Format Utility for free from https://www.kingston.com/ru/support/technical/downloads/111247
ADATA USB Flash Drive Online Recovery
The manufacturer Adata also has its own utility that will help fix flash drive errors if you cannot read the contents of the flash drive, Windows reports that the disk is not formatted, or you see other errors related to the drive. To download the program, you will need to enter the serial number of the flash drive (so that exactly what is required is downloaded) as in the screenshot below.

After downloading, run the downloaded utility and follow a few simple steps to restore the operation of the USB device.
Official page where you can download ADATA USB Flash Drive Online Recovery and read about using the program - http://www.adata.com/ru/ss/usbdiy/
Apacer Repair Utility, Apacer Flash Drive Repair Tool
Several programs are available for Apacer flash drives - different versions of Apacer Repair Utility (which, however, cannot be found on the official website), as well as Apacer Flash Drive Repair Tool, available for download on the official pages of some of the Apacer flash drives (look specifically on the official website your USB drive model and look at the downloads section at the bottom of the page).

Apparently, the program performs one of two actions - simple formatting of the drive (Format item) or low-level formatting (Restore item).
Formatter Silicon Power
Formatter Silicon Power is a free utility for low-level formatting of flash drives, which, according to reviews (including in the comments to the current article), works for many other drives (but use it at your own peril and risk), allowing you to restore their functionality when no other methods don't help.

The utility is no longer available on the official SP website, so you will have to use Google to download it (I do not provide links to unofficial locations within this site) and do not forget to check the downloaded file, for example, on VirusTotal before launching it.
SD Memory Card Formatter for repairing and formatting SD, SDHC and SDXC memory cards (including Micro SD)
The SD Memory Card Manufacturers Association offers its own universal utility for formatting the corresponding memory cards if problems arise with them. Moreover, judging by the available information, it is compatible with almost all such drives.

The program itself is available in versions for Windows (Windows 10 is also supported) and MacOS and is quite easy to use (but you will need a card reader).
You can download SD Memory Card Formatter from the official website https://www.sdcard.org/downloads/formatter/
D-Soft Flash Doctor program
The free D-Soft Flash Doctor program is not tied to any specific manufacturer and, judging by reviews, can help fix problems with a flash drive through low-level formatting.

In addition, the program allows you to create an image of a flash drive for subsequent work not on a physical drive (to avoid further malfunctions) - this can be useful if you need to get data from a Flash drive. Unfortunately, the official website of the utility could not be found, but it is available on many resources with free programs.
How to find a program to repair a flash drive
In fact, there are much more such free utilities for repairing flash drives than are listed here: I tried to take into account only relatively “universal” tools for USB drives from different manufacturers.
It is quite possible that none of the above utilities are suitable for restoring the functionality of your USB drive. In this case, you can use the following steps to find the program you need.

Additionally: if all the described methods for repairing a USB drive did not help, try.