Split the disk into windows partitions. How to partition a hard drive using a Windows utility and special programs? How to combine several local disks into one
How to split a hard drive into two partitions without data loss, provided that there is one partition converted to the main volume with the letter (C:), the operating system is installed on it and nothing should happen to it, how do you like the problem?
- Note: If you have a new operating system installed, you can divide your hard drive into partitions using the operating system itself, without resorting to third-party programs, here is the article, if something doesn’t work, use the universal one and free program in Russian.
- If you are on Windows 7, read here. If you have a new laptop, then you need this article.
Such tasks are very easily solved with special disk management programs, for example: Acronis Disk Director, Paragon, I work with all of them. The fact is that when working with such programs, it is easy to damage the partition table of the hard drive, then the computer will not be able to determine the location of the main partition with the operating system among the new volumes created by you, what then? That's right, you simply won't be able to boot into Windows. Acronis, also working from a boot disk, sometimes confuses partition letters.
- Therefore, before working with Acronis Disk Director, you need to insure yourself as much as possible and create a backup of all partitions of your hard drive. Every user should be able to create a backup of the operating system and, if necessary, deploy it back.
I do not want to intimidate you in any way, but simply warn you to be very careful when working with software for working with computers. hard disk partitions. I remember in the old days, when everything was just beginning, I always had several floppy disks in my pocket with the Partition Magic program in bourgeois language, yes, floppy disks, it worked from them, you insert it into the floppy and you always don’t know how it will end, but I will say Honestly, I only let you down a few times. And then I met Acronis and have not parted since then, although now I carry a large suitcase with me and there are always several boot disks with this program. Well, it's time to get down to business, otherwise you'll run away from the site and won't partition your hard drive.
How to split a hard drive into two partitions
As I said, we have the Windows XP operating system, but everything that will be said below can also be applied to Windows 7. The operating system has one system partition-disk (C:) with a capacity of 111.8 GB, which we will use divide into two sections, as a result we will have another drive (D:), don’t worry about your files on drive (C:) nothing will happen. Here it is our drive (C:), all alone.
Let's launch our program

In the main window of the program, our hard drive is visible as one partition-disk (C), with a capacity of 111.8 GB. Let's go with you to Actions and tools, and then Resize volume


change the volume size of 111.8 GB to, for example, 55.8 GB, so we will have a logical volume (D)


We have some unallocated space and we will convert it later into a logical volume (D)
Apply pending operations


Friends, now you can create the second partition you need, right in the operating system, go to Computer->Manage->Disk Management, right-click on the unallocated space and select Create Partition from the menu. Or you can use our program again.
We run our program again, select unallocated space with the mouse and click Create Volume

Select the type of volume to be created: Basic

Specify unallocated space
The computer hard drive is a means of storing system and user data in particular. Sometimes, it is necessary to divide information into some large sections to avoid confusion. It is recommended to install the system on one partition, and user files, programs, etc. save to others. When purchasing a new PC, most often the hard drive is not divided into local disks (partitions), so you need to carry out this operation yourself. Let's look at how to properly partition a hard drive. For example, we will use Windows 7, which is the most stable among current versions (Windows 8, 10).
Before you begin the process of partitioning your disk, we recommend that you familiarize yourself with the following tips:
- For the OS, allocate at least 50-60 GB of free space, otherwise you will not see normal system operation. Of course, if you have a hard drive of 100-200 GB, then allocating that much space is too troublesome, but for systems starting from the “seven” you need enough memory.
- It is also better to take care of the path for saving files for the browser and torrent client; it is better to set the path for uploading files for them not on the system drive (by default), but on another more capacious partition. You should also understand that desktop content takes up space on the system disk.
- If you have a hard drive up to 1 TB, divide it into 3 partitions, if from 1 TB to 2 TB, divide it into 4 partitions, and more than 4 TB into 5 partitions. This is explained by the fact that when downloading large files to the hard drive, optimal division will allow it to be written correctly.
- Do not use all available memory on your hard drive. It is necessary to leave some space “in reserve” to restore damaged clusters.
If you follow these tips, you can set up hard drive partitioning once and not worry about it again until you decide to expand the memory on your computer.
How to partition a hard drive in Windows 7?
To partition the hard drive, we will use a standard tool in the Windows operating system. It's called "Disk Management". To open this utility, you need to do the following:
Now let's move on to how to partition a hard drive in Windows 7. The instructions are as follows:

How to partition a hard drive in Windows 8, 10
Using Windows 7 as an example, we looked at the partitioning process. There will be nothing fundamentally new in the “eight” and “ten”, so you can use this procedure for this system as well. The only exception is that we will slightly adjust the tips to complete the task correctly:
- For the system disk, leave (add) at least 70-80 GB of information. Starting with "seven", the system writes information about the current state to the local disk so that you can use system recovery if necessary. In addition, after many updates (including up to 8.1, 10), large files are formed that are protected by the system;
- Divide the disk into several partitions, do not leave 2 partitions. This will make it more convenient for you to handle files that are recorded on your hard drive, logically structuring them into sections.
How to partition a hard drive in Windows 7, 8, 10 using third-party programs
What to do if you don’t trust the standard tool for working with local disks? We suggest using a third-party application Partition Wizard. This application is free, does not require much space and is stable. Of course, its functionality is far from Acronis Disk Director, but it will be just right for partitioning a hard drive.
So, first, download it and then install it in a convenient location on your computer. When the program is installed, run it and wait until it loads the necessary information about your system and hard drive.
An unallocated partition will be designated as "Unallocated". Right-click on it and click "Create".
When you run this command, you will need to provide the following information in the next window:
- Section title;
- Partition type (for example, logical);
- Drive letter;
- File system type;
- Volume.
Please note that in the case of the program that is built into the system - “Disk Management”, these operations are performed in different windows, but here, for convenience, everything happens in one window. For example, we created a new “Test” section with 400 GB on board. Once created, the file system looks like this:
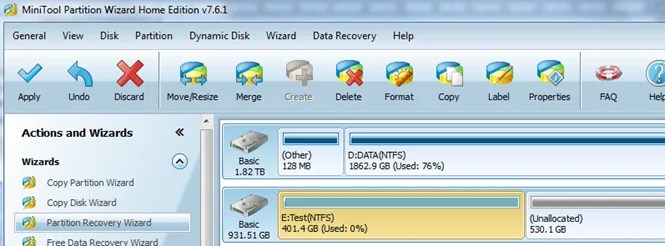
This process can be repeated as many times as you like until you run out of free unallocated space. Please note that it is very important to leave very little free space so as not to damage the hard drive. To create another new partition, simply repeat the instructions. Don't forget to save your progress using the Apply button.

As you can see, the process of dividing a disk into partitions is not complicated, but very simple if you approach the issue with instructions from our website.
There are times when when purchasing a computer or laptop, there is only one system drive “C”. I think everyone knows that having one partition is bad. After all, after reinstalling the operating system, all your files and documents will be permanently deleted. Therefore, you must have at least two partitions C and D. The first will contain the operating system with all the necessary programs, and the second will contain personal files (music, video, photos, etc.). To do this you need to partition the hard drive. So the question arises - How to partition a hard drive yourself in the Windows 7 operating system? At the same time, so that the files located on the hard drive are not damaged. The easiest way is split hard drive, using Windows 7’s own tools. And we will look at this method today.
How to partition a hard drive in Windows 7
So let's get started. Right-click on the “My Computer” icon and select Manage.

Find the "Disk Management" item and click on it.

Below you can see that I have 3 hard drives, and one of them (Disk 0) is already divided into two partitions.

Disks numbered 1 and 2 are not broken.

Using Disk 2 as an example, I will show you step by step how to partition a hard drive. It is not empty; it contains the operating system and various files. In your case, it will not be Disk 2, but Disk 0, since I have three hard drives installed in my computer.
So, we divide Disk 2 into two partitions - to do this, right-click on Disk 2 and select “Shrink Volume”.

There is a request for space for compression.

And in the window we see the available space for compression - 222361 MB.

Now we need to indicate how much we will compress the volume. If I didn’t touch anything here and click “Compress”, then the size of the volume with the OS would become small, that is, about 15 GB. This is naturally very small, so be careful.

It is clear that a lot depends on the overall size of your hard drive, but I would advise setting the size of the future partition C to at least 60 Gigabytes (I usually set it to 80-100 GB).
In this case, I will try to divide the hard drive into two equal partitions. I will set the size of the compressed space to 115,361 MB, this is exactly the partition that will be empty. And now we observe that the total size after compression has changed to the number 123,112 MB, that is, 120 GB, this is the system partition on which the operating system with programs is located.
In other words:
- The size of the compressed space is the size of the additional disk;
- The total size after compression is the size of system drive C. For example, you have a hard drive of 1000 MB in size, then you can allocate 100-150 GB to drive C, and the rest (850-900 GB) to the second drive.
After you have decided on the sections, click “Compress”. When the compression process is completed, there will be unallocated space. Now it needs to be converted to a simple volume. To do this, right-click on the unallocated space and select “Create simple volume.”


Then we assign any letter for the future partition (disk). I chose the letter F.
Recently, on laptops with Windows 10 installed, you can often find a situation where the entire hard drive is represented by just one local drive C. This causes some inconvenience, especially if in the future you have to reinstall the operating system, completely formatting the hard drive. In this article you will learn how to split a hard drive into 2 parts in Windows 10 without losing data. Moreover, we will do this using standard operating system tools without installing additional programs.
The process of splitting the system drive C into two local drives
It is worth noting that you can divide drive C into two disks by an amount equal to the free space on it. For example. If you have 200 GB free on drive C, and the entire disk is 465 GB, then after partitioning, the size of drive C will remain about 265 GB, and the new drive D, which will be obtained by splitting drive C, will be about 200 GB.
So let's get started.
First you need to go to " Disk management". To do this, right-click on the “Start” menu and select “ Disk management«.
Go to disk management
The second way to get to " Disk management" - through " ", where you need to select " Administration» -> « Computer management" and on the left in the menu " Disk management«.
Here we find drive C, right-click on it and select “ Compress volume...»

Find and select drive C
A window will open in which you need to select the volume in megabytes that will be cut off from drive C to create a new local drive. This volume will be almost equal to the free space on drive C.

Specify the amount of space to be cut off from drive C
You should not cut off the entire available space from drive C. Leave at least 10 GB of the available space for drive C, otherwise it will be almost completely full after partitioning!
Specify the size and click the “ Compress«.
After this, an area called “Unallocated” will appear in the Disk Management window. Right-click on it and select “ Create a simple volume...«.

Selecting an unmarked area
A window will open with the Create Simple Volume Wizard. Click the button " Further«.

New Volume Wizard in Windows 10
Then there will be several more dialog boxes in which nothing needs to be changed. Just press the button " Further«.

Specify the size of the new local disk

Finishing the process of partitioning drive C into two disks without losing data in Windows 10

Specify the label of the new local disk

Select a drive letter
As a result, you will have created a new local disk, which was obtained after partitioning drive C. Now you can copy data from drive C to the new disk.
In this simple way, within a few minutes you can split drive C into two disks without losing data in Windows 10 or the Windows operating system.
The best time to partition a Windows 7 disk is during Windows installation. We will perform all disk operations using the Windows 7 installer.
And so you have a new computer or a new hard drive on which you want to install Windows 7. Perhaps the computer is not new, the disk is also not the latest, but you want to kill EVERYTHING old on the disk and install Windows 7 cleanly, from scratch. By the way, it is always better to install Windows completely, that is, after formatting the disk. To do this, go to the BIOS, do the installation "", insert the installation into the drive and reboot the PC. If you want to install Windows from a flash drive, then first connect the flash drive, then turn on the computer, go into the BIOS, and make the installation Boot PC from a flash drive or USB drive.
Select the installation type "Full installation"
The installation of Windows 7 begins. When it comes to the screen shown in the picture above with the inscription “Select installation type”, select the second option with the inscription “Full installation”. It is outlined in a red rectangle.
Next, a screen will appear that says “Select a partition to install Windows.” If you have a new disk or a computer with which no one has done anything yet, then you will not have a single created partition and only the inscription “Unallocated space” and the full volume of the disk.
Disk setup

To start working with the disk, click the “Disk Setup” button. You will have several new buttons: “Delete”, “Expand”, “Format”, “Create”. See below.

Create a system partition
Click the "Create" button. And a line appears on our screen, consisting of a “Size” window and two buttons “Apply” and “Cancel”. 
Setting the size of the system partition
If you don’t change anything and just click the “Apply” button, then only one partition will be created, occupying the entire disk space. You can't do that!
For data security purposes and to speed up the operation of the OS, we will leave only a small piece for Windows. This will be the system partition. And we will use the rest of the space to store our data. And so on in the “Size” window, delete the numbers and write, for example, 50,000, as in the picture below, and click the “Apply” button. (Why exactly 50 GB is described in the article " ). Or other numbers if you want to create a disk partition of a different size. 
Creating/cancelling the creation of a "System Reserved" partition
A window appears with a prompt and a warning: "To ensure that all of its features work correctly, Windows may create an additional partition for system files." If you want your Windows to work correctly, click the “OK” button, as shown below on the screen. This is what the majority does and rightly so. (If someone suddenly wants their Windows to work less correctly, you can click “Cancel”. Then the partition for system needs will not be created and you will save only 100 MB of space on your huge hard drive. Well, I don’t think there are any like that. Although Anything can happen in life.) 
If you clicked the "OK" button, then two sections will appear on the screen at once: 1 - Reserved by the system exclusively for system files of 100 MB in size and 2 - Primary (this will be our system disk). There will also be a significant piece of unoccupied space left.

We create a partition for storing data.
Using the mouse, select the ruler with the unmarked area and click the “Create” button.

You will again have a ruler with a “Size” window and the “Apply” and “Cancel” buttons.

If you are not going to create additional sections (and I don’t advise you to create anything else unless absolutely necessary), then simply click the “Apply” button without changing anything. 
Another section will appear on the screen and it will be highlighted. The partitions we created are only allocated disk space. Now it needs to be formatted.
Formatting sections
Click the "Format" button and formatting of the highlighted partition will begin. And before that, the installer will display a message: “When formatting the disk, all information on it will be lost.” This is a warning in case you want to format an already working disk with data. And now we just need to format the prepared section. Otherwise we won't be able to write anything to it. Therefore, click the "OK" button 

The warning window will appear again. Click "OK".

This completes the creation of partitions. You have three partitions, but the first one is not yours, but reserved by the system. The second partition is the system partition, which is 50 GB - this one is for Windows OS. The third, with the remaining volume, is for your data. Your disks are formatted and ready to go. You can continue installing Windows 7. To do this, select the “second” partition, since the first one is reserved by the system. It is important not to make a mistake here. Otherwise, you can install Windows on another partition, and then dividing the disk will be completely pointless. Click the "Next" button. Windows installation will continue.
Removing partitions
If the computer is not new and the disk is already partitioned, but not as you need, the picture will be somewhat different. In the second picture you will have a picture that resembles the penultimate picture of this article. Then you will need to do this. Select the bottom section and click the "Delete" button (When you delete a partition, all information on it is lost). You will see a line called “Unoccupied Space”. Mark the section above it and also delete it, and so on until you have only one ruler left with an unoccupied space. And then we do everything as described starting from the second picture.
Resizing partitions
If you are reinstalling Windows 7 - 10 and want to change the size of drive C, but you have important information on drive D that you do not intend to delete, then you can perform the expand function.
All necessary sections must be created immediately . Otherwise, the unallocated space will not be available to the system. And you won't even know that you still have free disk space.
Well, if Windows works well, there is no need to reinstall it, but there is a problem with the volumes of the partitions and they need to be changed. What to do then? To solve this problem there is an excellent program "". It will help you change partition sizes without reinstalling Windows.